Seven Exercises to Get Your Year off to a Super Start

This is the year to get in shape. Where to start? Here’s a routine you can do easily at-home. A couple of light weights are all you need. Perform 2-3 sets of each exercise, 12-20 repetitions in each set. Rest 1-2 minutes between sets.

Bodyweight Squats

Do your bodyweight squats just like this, but at a slower tempo.

  1. Stand with your feet slightly wider than hip-distance apart, your toes angled slightly outward.

  2. Squeeze your glute muscles together, draw in your navel, roll your shoulders back, and imagine a string pulling your head up to the ceiling. 

  3. Press your hips back and begin bending your knees to perform the squat. Inhale as you perform this downward phase.

  4. Keep your torso up as you continue to press your hips back while you lower down. 

  5. Press through your heels and reverse the motion to return to the starting position. Exhale as you rise and press your hips forward at the top of the squat to engage your glutes more fully.

Push-ups 

  1. Get on the floor on all fours, positioning your hands slightly wider than your shoulders. Don't lock out the elbows; keep them slightly bent. Extend your legs back so you are balanced on your hands and toes, your feet hip-width apart. Pull your belly button toward your spine. Keep your body in a straight line from head to toe without sagging in the middle or arching your back.

  2. Inhale as you slowly bend your elbows and lower yourself to the floor. Don’t let your elbows flare out. Lead with your chest, not your head.

  3. Exhale while contracting your chest muscles and pushing back up through your hands, returning slowly to the start position. 

If push ups are challenging, here are a couple modifications.

Bent-Knee Push-Up

Perform the push-up on your knees rather than on your toes. Be sure to keep your knees, hips, and shoulders all in a straight line. Don’t bend at the hips.

Incline Push-Up

Place your hands on a table or bench and stand several feet away. Use the same push-up technique as above.

Romanian Deadlift

  1. Stand with your feet about shoulder-width apart, holding a pair of dumbbells.

  2. Keeping the dumbbells close to your thighs, with your shoulders back, your core tight, and glutes squeezed.

  3. Begin “pushing” your butt back as far as possible as you begin lowering your torso—as if you’re trying to close a car door while painting your thighs with the dumbbells.

  4. When the dumbbells reach your shins, pause, then stand back up.

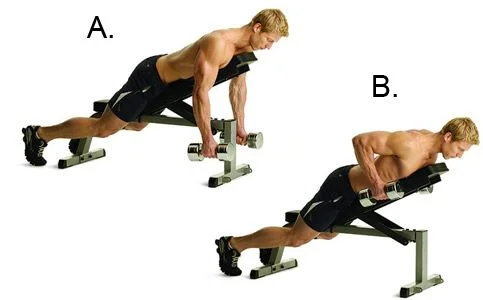
Bent-over Rows with weights

  1. While holding a dumbbell in each hand with a neutral grip, hinge forward until your torso is roughly parallel with the floor (or slightly above). Draw in your navel. 

  2. Pull the dumbbells towards your hips while squeezing the shoulder blades together. Then slowly lower the dumbbells back to the starting position under control. Don’t allow your head to jut forward.

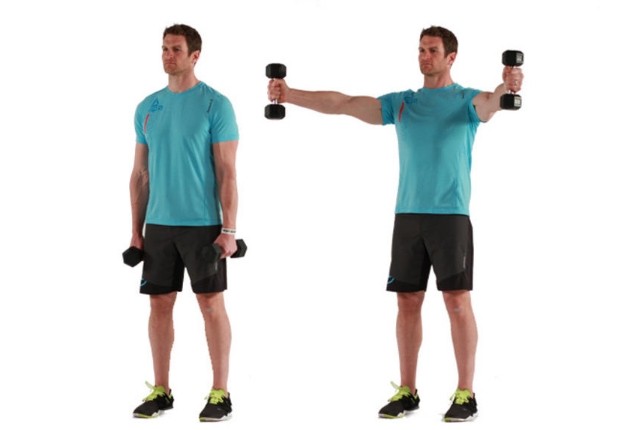
Squat to shoulder Press

  1. Grip one dumbbell in each hand with the palms facing each other and hold them in front of each shoulder with the elbows close to the body. 

  2. Push back into the hips and keep the back straight to lower into a squat holding the weights on the front of the shoulders. 

  3. When you’ve descended as far as you comfortably can, push both legs into the ground to stand up and at the same time press the dumbbells overhead by straightening the arms. 

  4. Slowly return the weights to the shoulders.

Plank 

  • On a mat, look face down with your forearms and toes on the floor. Place your elbows directly under your shoulders with your forearms facing forward. Look at the floor, between your hands. Draw your navel toward your spine. Keep your body in a straight line from your ears to your toes. Don’t arch your back, sag your hips, or tilt your head up. Keep your shoulders down, not creeping up toward your ears. Your heels should be over the balls of your feet.

  • Hold this position for 10 seconds. Release to the floor.

  • Over time work up to 30, 45, or 60 seconds.

If you find the plank difficult at first, try the Incline Plank as you build up strength.

Incline Plank

You can also do a plank with your forearms or palms resting on a bench or step. Place your forearms or palms on a flat, elevated surface with your elbows directly under your shoulders. Walk your feet back until your body forms a straight line on a diagonal. Pull your abs in as you tuck your tailbone slightly and actively press into your forearms or palms.

Bird Dog

  1. Get on all fours on an exercise mat or other cushioned surface with your knees hip-width apart and hands firmly on the ground, about shoulder-width apart. Draw in your navel toward your spine. This is the starting position.

  2. Point one arm out straight in front and extend the opposite leg behind you, forming a straight line from your extended hand to your extended foot. Point your foot back, not up. Keep your hips squared to the ground. If your low back begins to sag, raise your leg only as high as you can while keeping your back straight.

  3. Hold for two seconds, then return to the starting position. Keep your navel drawn in throughout the entire exercise and minimize extra motion in your hips during the weight shift. Perform this movement ten times. Switch to the other side.

  4. If this movement is hard at first, start by extending one arm slowly, not moving your knees or feet, then returning your arm to the starting position. When you can perform this movement ten times without shifting your hips, try extending one leg back, while keeping your hands on the floor, then returning your leg to the starting position. 

Don't Just Shuffle Along: Five Stretch, Strength, and Agility Exercises to Help Lift Your Feet While You Walk


You may have had the experience of going on a walk then unexpectedly catching your foot on a rise in the sidewalk. Sometimes people trip because of shuffling: dragging their feet while they walk. Some reasons for shuffling include stiff ankles, problems with balance, and arthritis or joint stiffness that makes it difficult to raise the knees. Try out these stretch, strengthening, and agility exercises. Then enjoy your stroll!

Upper and Lower Calf Stretches

Stiff calves make it difficult to lift the toes as one steps. 

Upper Calf Stretch.

Stand about three feet from a wall and put your right foot behind you. Point your toes forward. Keep your heel on the ground and lean forward with your right knee straight. Hold this stretch for 30 to 60 seconds. Repeat on the other leg.

Lower Calf Stretch.

Stand away from a wall and put your right foot behind you and place your left toe about six inches before the wall. Lean forward at the ankle while bending the left knee. Hold this stretch for 30 to 60 seconds. Repeat on the other leg.

Seated toe raise

To lift your toes while you walk you need to increase the strength in the muscles of your feet. Here’s a simple exercise to strengthen those muscles.

Sit on the edge of a sturdy chair with your knees at right angles and your feet flat on the floor. Sit up straight with your shoulders back. Keeping your heels on the floor, raise your toes up off the ground as far as you can. Hold the position for three seconds, then slowly lower. Repeat 20 to 30 times.

Step to balance

Now that your ankles are stretched and the muscles of your feet are strong, you want to make sure you are lifting your feet by raising your knees while keeping well balanced.

Stand in front of a step or a box and step up onto it with one leg. Move the opposite hip and knee into a flexed position and hold for a few seconds. Move the lifted leg back down to the ground and follow with the balance leg. Alternate steps.

Cariocas

You can do this exercise without a ladder.

A key aspect of risk free walking is to move with good agility in different directions. The Carioca exercise helps you move sideways while rotating your hips. You’ll need at least 15 feet to effectively do this exercise.

Standing with your feet shoulder-width apart (the starting position), push off with the left foot and bring it towards the right foot. Cross the left foot behind the right foot and plant it on the ground. Move the right foot laterally. Cross the left foot in front of the right foot and plant it on the ground. Move the right foot laterally so you return to the starting position. Reverse the steps to perform this drill while moving to the left. 

Four Great Balance Exercises to Perform While You Walk

After you master stationary balance exercises, it’s time to challenge your balance through walking exercises. These practical exercises will help you move confidently, both on busy streets and on uneven trails.

Heel Walk

From a standing position, pull your toes toward your shins so that only your heels contact the floor.

Take small steps forward while keeping your toes off the ground.

Toe Walk

From a standing position, raise up on the balls of your feet so that your heels are off the ground as high as they will go.

Walk forward while staying on the balls of your feet and keeping your heels off the ground.

March in Place With Head Turns

This exercise prepares you for the next exercise.

From a standing position, march in place by alternately raising one knee in front of your body at a time to hip height.

Swing your bent arms as you normally would when you are marching or walking, with the opposite hand and knee coming forward.

Match the cadence of your marching by alternately turning your head to the same side as the knee that you lift.

Walking with Head Turns

Walk straight ahead using confident strides swinging your arms normally with the opposite hand and foot coming forward.

Match the cadence of your steps by turning your head to the same side as the foot that’s stepping forward . In other words, look right when you step forward with your right foot and look left when you step forward with your left foot.

Four Standing Exercises to Improve Your Balance

Many of my older clients began training with me because they lost their balance. Sometimes they tripped while walking. Other times they bent down, became dizzy, and fell. They were right to be concerned. For seniors, falls frequently lead to serious injury. To enjoy life, such as traveling or playing with the grandkids, good balance is crucial.

Here are four exercises to improve your balance that you can perform while standing stationary. 

  1. Four Position Balance

Stand up straight and cross your arms over your chest. Focus on an object in front of you at eye height. When you can hold a position for thirty seconds, advance to the next position.

Position 1: Place your feet side by side so the sides of your feet touch each other.

Position 2: Move one foot slightly forward so that the heel of the front foot touches the ball of the back foot.

Position 3: Place one foot directly in front of the other so that the heel of the front foot touches the toes of the back foot.

Position 4: Raise one foot a few inches off the ground. Then hold this position with the other foot.


2. Single-leg Stance with Head Turns

Once you can stand on one foot for thirty seconds, turn your head to the right and left ten times.

3. Ankle Sway

Stand straight with your feet shoulder width apart. Moving just your ankles, lean forward as far you can go. You’ll feel your toes digging in and your heels starting to come off the ground.

Then lean backwards as far as you can. You’ll feel your weight shift to your heels and your toes starting to come off the ground.

Slowly sway forward and backward. Be sure not to bend at the hips.

Don’t be surprised if you have to take a step either forward or backward. That’s fine. As you get better at this, move the feet closer together until they’re right beside the other.


4. Clock touches

Stand straight with your feet close together. This is your starting position.

Imagine that you are standing in the middle of a big clock face with the 12 directly in front of you.

Reach with your right foot for the 12 as far as you can and lightly touch the floor while keeping your weight on your stance leg. Return to the starting position.

Repat for the 1 O’Clock position, 2 O’Clock position and so forth until you reach 6 O’Clock.

Repat with the other leg starting at 12, moving counterclockwise to 11 O’Clock, 10 O’Clock and so forth until you reach 6 O’Clock.

In the next post, I’ll show balance exercises to perform while you’re walking.

Four Core Exercises You Can Do While Standing

Four Great Core Exercises You Can Do While Standing

Core strength delivers free movement and supports your lower back. Often, core exercises are performed while lying on a mat. Let’s be real. It’s not always easy to get down on a mat, especially if your knees hurt. Don’t other options exist? They do! Don’t just do something. Stand there! Here are four great core exercises you can do while standing.

Palluf press

Set the resistance band anchor at about elbow height. Take one step away from the anchor point while holding the resistance band at elbow height at the center of your body. Squeeze your glute muscles together and draw in your navel. Don’t face the anchor point. Turn 90 degrees to the right or left.

With your feet and torso in line with one another, hold the resistance band with both hands, interlocking your fingers. Press straight out from your body. Slowly return your hands back to your chest. Don’t let your body rotate towards the anchor.

Do 10 repetitions per side.

Resistance band woodchop

With your feet wider than hip-width apart, stand on both ends of a resistance band with your left foot. Grasp the center of the resistance band with both hands. Squeeze your glute muscles together and draw in your navel. Keeping your arms straight with the elbow slightly bent, pull the resistance band up and across the body toward your right side. Return your hands back to your left side to just below hip level.

You can make this exercise more difficult by using a shorter resistance band or stepping on the resistance band closer to where you place your hand.

Do 10 repetitions per side.

Standing stabilization

Stand with your feet hip-width apart, hold a medicine ball or dumbbell with both hands, and extend your arms in front of your chest.

Keeping your arms straight and shoulders pressed down, rotate your upper body to the right and then return to the center. Pivot on your left foot. Don’t let your shoulders climb up to your ears. 

Do 10 reps to the right, then 10 to the left.

Farmers carry

  • Stand with your feet hip-width apart with a dumbbell or kettlebell to the side of one foot.

  • Bend your knees and lower into a squat position with your trunk up and weight evenly distributed across your feet. 

  • Grip the weight, squeeze your glutes, draw in your navel, roll your shoulders back, and keep your head up. 

  • Keeping your torso up, look forward, and push the ground away to stand.

  • Here’s the main part of the exercise. Walk slowly for twenty feet without leaning back or over to one side. Repeat holding the weight with the other hand.

Resistance Exercise Has Yet Another Great Benefit: Stress Reduction

Resisance exercise helps reduce stress.

“I was feeling stressed from work when I started, but now I feel much better.” I hear this remark frequently from my personal training clients. They also tell me that one of the many benefits of resistance training is both feeling better after one session and controlling stress over time. What’s the evidence that resistance exercise reduces stress? And if exercise does reduce stress, what is it about exercise, and resistance training in particular, that reduces stress?

Multiple studies demonstrate the anxiety-reducing effects of single bouts of resistance exercise, depending on the intensity of the workout. In a 24-week, community-based intervention, researchers observed greater decreases in anxiety in older participants (65–75 years) performing exercise at 50% their maximum weight on an exercise, to those exercising at 80%. In contrast, a work-place intervention using light resistance training (30% 1RM) failed to reduce anxiety outcomes. To reduce stress, make sure the workout isn’t too hard or too easy. 

A number of studies have demonstrated the long-term benefits of resistance exercise. (Resistance exercise includes free weights, machines, bodyweight exercises, and bands.) Several studies examined the effects of resistance exercise on anxiety in older populations (>60 years). These studies indicate that participating in regular resistance exercise decreases stress for older populations. 

One study looked at whether resistance exercise led to reduced anxiety on healthy people with low levels of anxiety (New York Times, July 26, 2021). To find out, researchers recruited 28 physically healthy young men and women and tested their current moods, particularly whether the volunteers felt anxious. All the participants scored in a healthy range on detailed anxiety questionnaires. Researchers asked half of the participants to continue with their normal lives as a control group. The other half began to weight train, a practice with which few were familiar.

After eight weeks of training, the weight trainers scored about 20 percent better on the tests of anxiety than the control group. They had started with low levels of anxiety to begin with, but felt even less anxious after eight weeks of training.

The researchers didn’t study why the weight lifting group experienced less anxiety, but they suspect increased physical and psychological potency has something to do with it. The lifters became stronger over time and able to lift heavier weights. “Feelings of mastery may have occurred” leaving people feeling generally more capable of coping. 

The mental benefits of exercise also have a neurochemical basis. Exercise reduces levels of the body's stress hormones, such as adrenaline and cortisol. Exercise also stimulates the production of endorphins, chemicals in the brain that are the body's natural painkillers and mood elevators. Endorphins are responsible for the "runner's high" and for the feelings of relaxation and optimism that accompany many hard workouts.

Behavioral factors also contribute to the emotional benefits of exercise, including resistance training. As one’s waistline shrinks and strength and stamina increase, a person’s self-image improves. Exercisers earn a sense of mastery and control, of pride and self-confidence. Their renewed vigor and energy help them accomplish tasks, and the discipline of regular exercise helps achieve other important lifestyle goals.

By preventing bodily illness, exercise reduces the stress caused by poor health. Regular physical activity lowers blood pressure, improves cholesterol, and reduces blood sugar. Exercise cuts the risk of heart attack, stroke, diabetes, colon and breast cancers, osteoporosis and fractures, obesity, depression, and even dementia. Exercise slows the aging process, increases energy, and prolongs life.

In the middle of a stressful period, it’s easy to put your workouts aside. The best time, however, to work out is when you’re experiencing stress. In a less anxious state, you can deal with stressful situations more rationally and make better decisions. 

Four Exercises to Get You Ready for Your Next Trip

You’ve planned the big trip. Culture and nature await. To get to your destination, you’ll carry suitcases onto the plane or train and hoist them to overhead compartments. After you arrive, you’ll duck under ropes in front of museums or crouch under low-lying branches. You’ll climb stairs in medieval cathedrals or step over logs in ancient forests. Here are a few exercises to add to your workout to get you ready for the time of your life.

  1. Farmers carry

Travelers always carry stuff. Suitcases, bags full of souvenirs, small kids. Here’s a great exercise to strengthen the shoulders, arms, back, legs, and core.

  1. Stand with your feet hip-width apart with a dumbbell or kettlebell (or suitcase, why not?) to the side of one foot.

  2. Bend your knees and lower into a squat position with your trunk up and weight evenly distributed across your feet. 

  3. Grip the weight, squeeze your glutes, draw in your navel, roll your shoulders back, and keep your head up. 

  4. Keeping your torso up, look forward, and push the ground away to stand.

  5. Here’s the main part of the exercise. Walk slowly for twenty feet without leaning back or over to one side. Repeat holding the weight with the other hand.

    2. Deadlift to curl to OH press

You’ve made it through security and onto the plane. Now it’s time to get your suitcase into the overhead bin. Thank goodness you trained for this.

  1. Stand with your feet directly under your hips, holding a dumbbell in each hand.

  2. Push your butt back as you bend your knees, squatting down as far as you're comfortable. Keep your back straight, not curved or arched. Keep your torso and head up.

  3. Push through your heels to return to standing while performing a bicep curl, bringing the weights to your shoulders.

  4. Draw your navel in and keep your arms moving upward, performing an overhead press with the palms facing out.

  5. Slowly lower your arms back to your side to complete one repetition.

Complete 10 repetitions.

3. Lateral Duck Under

Don’t be surprised if you have to duck. Does that rope in front of the museum serve any real purpose? Just duck under. That low-lying tree limb isn’t going anywhere soon. You’ll have to duck under. 

  1. Imagine a bar that is just above waist height. Stand with your left side next to the imaginary bar.

  2. Squat down and take a big step under the imaginary bar with your left leg. Plant your left foot on the opposite side of the imaginary bar and switch weight onto that foot while squatting under the bar. Keep your butt back and your torso up.

  3. Next, bring your right foot over to your left foot and stand up. This completes one rep. Reverse the movement toward the opposite side.

Complete ten repetitions to each side.

4. Step ups to knee lift

Stairs in medieval cathedrals or ascents in ancient forests elevate us physically and spiritually. Here’s an exercise to help you reach new heights.

  1. Position your right foot on a step.

  2. Step up with your left leg, and without touching the step with your left foot, lift your knee towards your chest.

  3. Step straight back down again with your left foot and then your right foot.

  4. Do the same motion positioning your left foot on the step.

Complete ten repetitions on each foot.

Add these exercises to your regular workout to be ready for whatever comes your way. Enjoy your journey!

Five Exercises to Help Your Aching Knees

I can’t say that knee pain is the worst, but it’s right up there. When your knees hurt, every movement on your feet reminds you that something’s wrong. Everything you like to do while standing hurts: walking, running, playing tennis or golf, or climbing stairs.

Knee pain afflicts millions of people every day, affecting approximately 25% of adults. Knee pain affects young and old. Knee pain may start suddenly, often after an injury or exercise. Knee pain also may begin as mild discomfort, then slowly get worse. 

Excessive weight, overuse, arthritis, and injury can all lead to knee pain. The good news is that you can strengthen the muscles that attach to the knee. Exercises that strengthen the hip muscles also help, since the hips control the position of your knees when you are walking, running, or jumping. 

Try these five exercises to support your knees.

Calf raises

  1. Starting position: Stand with your feet shoulder-width apart with toes pointing forward. Squeeze your glute muscles together, draw in your navel, roll your shoulders back, and look forward. 

  2. Raise your heels slowly, keeping your knees straight, but not locked.

  3. When you're standing fully on the balls of your feet, pause for one second.

  4. Slowly lower your heels back to the ground, returning to the starting position. 

Go for 10-30 reps.

If you find it hard to keep your balance while doing calf raises, then hold on to the back of a chair.

Once you can do calf raises without holding on to a chair, increase the range of motion by doing the movement on a step or stair. Stand with the balls of your feet on the step or stair, raise your heels up as far as you can, then lower them slowly until your heels are just below the top of the step or stair. Once you feel a good stretch in your calf muscles (stretch, not pain), return to the starting position.

To take it to the next level, use dumbbells, kettlebells, or even gallons of water to add weight to your raises. Hold the weights at your side during this movement with your arms straight down.

Side-Lying Hip Abductions

Side-lying hip abductions work the outside hip muscles. Studies find that doing hip abductor exercises for just three weeks helps reduce knee pain. 

  1. Starting position: Lie on your right side with legs straight and feet stacked one on top of the other. Don’t lean forward or back. Bend your right elbow and place that arm underneath your head, allowing the full weight of your head to rest on your forearm so that it’s in line with your spine. Squeeze your glute muscles together, draw in your navel, and roll your shoulders back. Keep your feet in a neutral position, perpendicular to your legs. The top arm rests on the outside of the left thigh. 

  2. Slowly raise your left leg to just above your hip joint, exhaling as you go. Once you feel your hips and back start to tense, stop and hold the position for two seconds.

  3. Slowly lower your leg to its starting position as you inhale. Keep the leg straight and stacked directly above the lower leg. 

  4. After completing ten reps on the right side, flip over to your left side and repeat the process with your right leg.

Once you've mastered the side-lying hip abduction, add resistance bands or ankle weights. Start with lighter resistance bands or weights and increase the tension or weight as you get stronger.

Side-Lying adductions

This exercise works the inside of your thighs.

  1. Starting Position: Lie on your right side with your legs straight, feet together in neutral position pointing away from your body (at 90 degrees to your shinbone). Keep your right arm bent and positioned under your head for support while the left arm rests on your upper hip. Your hips and shoulder should be aligned vertically to the floor. Your head should be aligned with your spine. Slowly move your left leg forward until it lies in front of your right leg. Rest both feet on the floor and keep both legs extended with feet in neutral position.

  2. Upward Phase: Exhale and gently raise the right leg off the floor while keeping the leg straight and the foot in a neutral position. The hips should remain vertical to the floor (the knee of the raised leg should not rotate upward towards the ceiling or downward towards the floor). Continue raising the leg until your hips begin to tilt sideways or until you feel tension develop in your low back or oblique muscles. The leg only needs to rise a few inches off the mat/floor.

  3. Downward Phase: Gently inhale and slowly return the right leg to the starting position in a controlled manner. After completing ten repetitions, roll over and repeat with the left leg.

Bridges

Bridges work your gluteal muscles.

  1. Starting position: Lie on your back, rest your hands at your sides, bend your knees, and place your feet flat on the floor, beneath your knees. Squeeze your glute muscles, draw in your naval, and bring your shoulder blades together.

  2. Slowly raise your hips to create a straight line from your knees to your shoulders. Feel your glutes working.

  3. Slowly lower your hips to the floor. Complete ten repetitions.

Step ups

Step-ups target the quadriceps and hamstrings, which attach to the knees, as well as the gluteal muscles. 

  1. Starting position. Squeeze your glutes together, draw in your navel, roll your shoulders back, and look straight ahead.

  2. Place your right foot onto the step or stool and push up through your heel to lift yourself up, making sure your foot is planted entirely on the step, then bring your right foot onto the step.

  3. Step back down with your left foot, concentrating on flexing the hip and knee of your left leg. 

  4. Repeat on the other side. That’s one repetition. Complete 10 repetitions.

There you have it. You can complete these exercises in less than ten minutes. Do these three times a week to get the support your knees deserve.

Ten Philosophical Fitness Quotes

Given a choice, a lot of us would rather exert our minds over a good book than exert our bodies over a set of dumbbells. Great philosophers over several millennia, however, have encouraged the development of both mind and body. Whether it’s to start or to keep going on a fitness program, may you find inspiration from these quotes by great minds.

  1. The immortal gods have made it so: To achieve excellence, we first must sweat. 

    Hesiod, 700 B.C.E.

  2. Besides, it is a disgrace to grow old through sheer carelessness before seeing what manner of person you may become by developing your bodily strength and beauty to their highest limit. But you cannot see that, if you are careless; for it will not come of its own accord.

    Socrates (469–399 B.C.E.)

  3. Why, even in the process of thinking, in which the use of the body seems to be reduced to a minimum, it is a matter of common knowledge that grave mistakes may often be traced to bad health. 

    Socrates

  4. Excessive emphasis on athletics produces an excessively uncivilized type, while a purely literary training leaves men indecently soft. 

    Plato (428-348 B.C.E.)

  5. In order for man to succeed in life, God provided him with two means, education and physical activity. Not separately, one for the soul and the other for the body, but for the two together. With these two means, a person can attain perfection. 

    Plato

  6. As for athletic training, we assert that it is a form of wisdom. 

    Philostratus, 220 A.D.

  7. It is not a mind, it is not a body that we are training; it is a man, and he ought not to be divided into two parts. 

    Michel Montaigne (1533-1592)

  8. A sound mind in a sound body, is a short, but full description of a happy state in this world. 

    John Lock, 1693.

  9. Not less than two hours a day should be devoted to exercise, and the weather shall be little regarded. If the body is feeble, the mind will not be strong. 

    Thomas Jefferson (1743-1826).

  10. How vain it is to sit down to write when you have not stood up to live! Methinks that the moment my legs begin to move my thoughts begin to flow. 

    Henry David Thoreau, 1851

Here’s a bonus quote from a modern writer: 

We like our minds to be knowledgeable, well stocked with information; we should also want our bodies to be similarly endowed. The erudite body is a good body to have. 

Colin McGinn, Sport, 2008.

Let’s Dispel these Five Fitness and Diet Myths

Weight lifting makes you bulky. Cardio on an empty stomach makes you lose weight. Some false ideas about fitness and nutrition take on a life of their own. Let’s move past these five diet and fitness myths.

Myth No. 1: Weight lifting makes you bulky

It’s the opposite. If you lift weights and maintain the same weight, you get smaller. Muscle is more dense than fat. If you lose fat and gain muscle, you become smaller at the same weight. Lifting weights, or other resistance training, builds lean muscle and reduces fat.

Myth No. 2: Low-carb diet is the only way to lose fat

The myth goes like this: when you cut carbs, your body's insulin levels drop, which burns fat. To put that theory to the test, researchers recruited 19 obese volunteers to participate in a rigorous study. For two weeks they lived in a lab. One group received a low-carb diet that reduced their total calories by 30 percent. Another group went on a low-fat diet that also reduced their total calories by 30 percent.  After four weeks both groups lost about one pound of body fat. That’s right, no difference. If you want to lose fat, reducing total calorie intake matters most, not whether it’s fat or carbs.

Myth No. 3: Protein harms your kidneys

The myth says that protein harms your kidneys, since kidneys work harder to clear the metabolites of protein, increasing the strain on the kidneys. Not to worry. Adding more protein to your diet may increase the kidney’s workload a little, but this increase is quite insignificant compared to the immense amount of work your kidneys already do. To give you an idea, about 20% of the blood your heart pumps through your body goes to the kidneys. The kidneys filter around 48 gallons of blood every day. Your kidneys keep plenty busy. They won’t notice a little more protein.

One important exception: High protein intake may cause harm in people diagnosed with kidney disease. 

Myth No. 4: Cardio is the fastest way to lose weight

It makes sense. Hours spent sweating on those gym cardio machines should burn calories so you lose weight. Calories in against calories out, right? Yes, cardio burns calories, but not as much as you think. Researchers found that cardio reduces body fat, but it takes about 11 hours per week, a commitment beyond what most of us are willing and able to make. 

To lose fat, first reduce calories, lift weights (or other resistance training), control stress, and sleep well. Then add cardio.

Myth No. 5: Cardio on an Empty Stomach Burns Fat 

The myth is that when you exercise on an empty stomach, your body has fewer carbs to burn for fuel, so your body uses fat for energy. Jump out of bed and hit the treadmill before breakfast. Voila! Fat loss.

To test this idea, researchers assigned healthy young females to two groups, one that worked out in the morning before eating and one that worked out in the morning after drinking a meal replacement shake. Alas, after four weeks, both groups lost the same amount of weight and fat. It really matters what you eat over 24 hours if your goal is to shed body fat.

Eight Great Reasons to Engage in Resistance Training

When you walk into the gym, you often see all the cardio machines taken up. Fewer people, however, are working out at the dumbbell rack or weight machines. Those cardio-heads are missing out. Cardio is important, but to maximize the benefits of exercise, make resistance exercise the foundation of your workout. Resistance exercise includes free weights, body weight exercises, machines, and bands.  

Here are eight great reasons to engage in resistance training.

1. Improves functional performance as we age.

Resistance training by older adults enhances movement control, functional abilities, physical performance, and walking speed. Resistance training reduces low back pain, arthritic discomfort, and pain associated with fibromyalgia. Resistance training reverses the debilitating effects associated with inactive aging, even in elderly individuals. 

2. Prevents injuries

People who engage in resistance exercise fall less, fracture bones less often, and strain their muscles less often during sports.

3. Builds a stronger, more resilient body

Resistance exercise increases bone density and muscle mass. Resistance exercise improves joint stability, balance, and coordination.

4. Decreases risk of disease

Resistance exercise prevents osteoporosis and osteoarthritis. Resistance exercise improves insulin sensitivity and prevents insulin resistance. It decreases high blood pressure and reduces the risk of hypertension. Resistance exercise reduces the risk of type II diabetes, heart disease and heart attacks, strokes, and cancer.

5. Improves brain health and mental health

Resistance training for adults reduces symptoms in people with fatigue, anxiety, and depression; improves cognitive abilities in older adults; and improves self-esteem. 

6. Improves sexual health

Resistance training increases testosterone, increases libido, improves sexual satisfaction, and decreases the risk of erectile dysfunction.

7. Improves quality of life

People who engage in resistance exercise report greater life satisfaction and happiness. They sleep longer and more deeply. They age more slowly and are less likely to die prematurely. They report increased daily energy and reduced fatigue.

8. Improves physique

You can see this yourself. People who engage in resistance exercises have better defined muscles and more upright posture. Since resistance exercise supports fat loss, they have flatter stomachs and firmer rear ends. They carry themselves with more confidence.

By all means do cardio, but don’t sell yourself short. Resistance exercise is the closest thing we have to the fountain of youth.

Four Core Exercises to Help Your Lower Back

My new personal training clients often complain of lower back pain. It’s no surprise. Eighty percent of Americans develop lower back pain. I tell my new clients that one of the best things they can do to address back pain is to build their core. The core includes the abdominals, the deep back muscles, as well as the hip muscles. These muscles support the spine and pelvis. Core muscles work like a back brace, keeping the midsection stable and upright.

I tell my clients that the goal isn’t a six-pack, though there’s nothing wrong with that. Crunches and sit ups mainly work the larger, exterior muscles up front, but don’t work the deeper abdominal muscles. Those deeper muscles that attach to the spine and pelvis are the ones that help protect the lower back. Working those deep muscles, along with strengthening hip and back core muscles, is the path to rehabilitating the lower back.

Here are four exercises to strengthen your core.

Planks

Planks work the deep core muscles that serve as a corset to protect your lower back. Lie face down with your forearms and toes on the floor. Lift your entire body off the ground until it forms a straight line from head to toes, resting on your forearms and toes. Make sure your elbows are directly under your shoulders. Relax your head while you look at the floor.

Draw in your navel toward your spine. Keep your shoulders down, not creeping up toward your ears. Your heels should be over the balls of your feet. Squeeze your glute muscles together. Don’t arch your back, sag your hips, or tilt your head up. Try to hold that position for twenty seconds.

If that’s too hard, keep the plank position while placing your knees on the mat. Still keep your body straight from knees to toes. Another way to make the plank less difficult is to place your hands on the floor, like you’re doing push-ups, with your knees on the floor, keeping the plank position. You can also make it less difficult by placing your hands or forearms on an elevated surface, like a table or chair, still keeping your body straight from head to toes.

Side planks

Side planks build the muscles that run along the side of your abdominals. Lie on your right side, with your legs extended and stacked from hip to feet. Place the elbow of your right arm directly under your shoulder. Keep your head directly in line with your spine. Your left arm can lie along the left side of your body. Draw in your navel toward your spine and roll your shoulders back. Squeeze your glute muscles together. 

Lift your hips and knees from the floor while exhaling. Keep your torso straight with no sagging or bending. Hold the position for ten seconds, longer if you can. Change sides and repeat.

You can make the exercise less difficult by lifting from your knees, instead of your feet. Another way to make it less difficult is by placing your forearms on an elevated surface, like a table or chair.

Floor Bridges

This exercise builds your glutes, which are crucial to support your lower back. Lie on your back with your knees bent and feet pointing forward. Draw your navel toward your spine. Raise your hips off the floor until they line up with your knees and shoulders. Squeeze your glute muscles, then return slowly to the starting position and repeat. Complete ten repetitions. 

Bird dogs

Bird dogs strengthen the core muscles in the back of the body. Find a spot with enough space to extend an arm and leg at the same time. Get on all fours on an exercise mat or other cushioned surface with your knees hip-width apart and hands firmly on the ground, about shoulder-width apart. Draw in your navel toward your spine. This is the starting position.

Point one arm out straight in front and extend the opposite leg behind you, forming a straight line from your extended hand to your extended foot. Point your foot back, not up. Keep your hips squared to the ground. If your low back begins to sag, raise your leg only as high as you can while keeping the back straight.

Hold for two seconds, then return to the starting position. Keep your navel drawn in throughout the entire exercise and minimize extra motion in your hips during the weight shift. Perform this movement ten times. Switch to the other side.

If this movement is hard at first, start by extending one arm slowly, not moving your knees or feet, then returning your arm to the starting position. When you can perform this movement ten times without shifting your hips, try extending one leg back, while keeping your hands on the floor, then returning your leg to the starting position. 

When your core muscles are strong, it's easier to swing a golf club, get a glass from the top shelf, and bend down to tie your shoes. Weak core muscles leave you more prone to poor posture, lower back pain, and muscle injuries. Strengthening your core muscles helps back pain diminish and lowers the risk of falls. Give these four exercises a try to get a strong core. Having strong core muscles just makes your life better.

Strength Training Cures a World of Ills

In the first session with one of my personal training clients, now retired, she described a list of ailments that seemed to get worse by the year. She tired more easily and fell more often. She found it more difficult to get out of bed, stand up from the dinner table, and climb the stairs. “It used to be so easy to do things. What happened?”

I told her the answer is muscle loss. Muscle loss causes many of the challenges that come with aging. After age 35, inactive adults experience a 3% to 8% loss of muscle mass per decade. Less muscle means greater weakness and less mobility, which explains a lot of my client’s problems. Loss of muscle means losing strength and gaining fat. Muscle loss is associated with heart disease, diabetes, and dementia. People with the lowest amounts of muscle are at the greatest risk of dying prematurely from all causes. People who have lost muscle are also at greater risk of osteoporosis. The drop in strength from muscle loss means being more prone to falls and bone fractures. This fear of falling may make some people more sedentary, which reduces their quality of life and puts them at a greater risk of depression. 

My client wanted to regain her former vitality, but didn’t know where to start.

I prescribed a special treatment that slows down the aging process. I explained that this treatment helps to gain more strength, walk faster, and improve thinking skills. It also helps ward off diseases such as diabetes. This treatment helps lower blood pressure and strengthens bones. It eases back pain and reduces the pain from arthritis. It also improves emotional health and leads to better sleep. As an extra added benefit, this treatment helps reduce fat.

The special treatment is strength training. Strength training may sound intimidating–didn’t Arnold Schwarzennegar lift hundreds of pounds?–but it can be as simple as a few carefully chosen body weight exercises. Dumbbells and resistance bands make for a great workout. Some people like the machines at the gym, but that’s not vital. There is no such thing as being too old or too out of shape to benefit from a strength training program. People have successfully started strength training in their 70s, 80s, and even 90s. 

My client started training with me three times a week.  I set up a training program and taught her how to properly perform each exercise. Over time, she went about her day with more energy and she no longer fell. When getting together with friends for dinner she could easily stand up from the table while her companions struggled to stand as they complained about sore knees and back. She walked the stairs of her house and easily completed chores that were once daunting. The special treatment of strength training made all the difference.

The Research is In: Exercise Key to Brain Health

PorchGuy_Its_a_Wonderful_Life-1946-VMSS-0788.jpg

In the movie, It’s a Wonderful Life, an older man on the porch castigates a young Jimmy Stewart, “Youth is wasted on the wrong people.” His complaint aims not only at Jimmy Stewart, whose physical vigor exceeds his life experience, but at himself, whose life experience exceeds his physical vigor. He feels his mind and body slowing down.

Some of us relate to the old man on the porch. Sure, we can’t stop getting older, but we can slow down our mind’s decline. A growing body of  research points to exercise as key to keeping our mind sharp as we age.

Perhaps the greatest fear of the Boomer generation is being afflicted with Alzheimer’s. In a study published in the journal BMC Public Health, researchers reviewed 150 research articles examining the impact of physical activity on Alzheimer’s. They concluded that physically active older people were significantly less likely to develop the disease compared to people who were inactive.

Of course, there’s more to brain health than avoiding Alzheimer’s. In a study published in the journal Cortex, researchers assessed the heart and lung fitness of older adults (aged 55 to 74) by testing their ability to remember the names of strangers in a photo. MRI scans recorded images of their brain activity as they learned the names. Older adults with high levels of heart and lung fitness did better on the test and showed more brain activity when learning new names than those of peers with lower levels of heart and lung fitness.

In a study published in the Journal of the American Geriatric Society, researchers looked at the connection between weight-training and brain function. Researchers had 100 people aged 55 to 86, all with mild memory and thinking problems, train with weights twice a week for six months. Participants showed significant improvement in mental function, which lasted for more than a year.

So take heart. No matter your age or state of health, it’s never too late to exercise. The best exercise is the one you’ll do. If you love to walk, lace up your shoes. If dancing’s your thing, cut a rug. Like to golf? Bring your A game. You can tend your garden or renew your gym membership. The possibilities are endless. Whatever you do, aim to meet the American Heart Association’s recommendation of at least 150 minutes a week of moderate exercise or 75 minutes per week of vigorous exercise,  or a combination.

Young people shouldn’t get a monopoly on the vigor of youth. They just waste it. You can be young in mind and body by making exercise part of your daily routine. Figure out what kind of movement you enjoy most and go for it!

For your back, don't do that, do this.

You may have seen other gym-goers performing Bent Over Rows, either with a barbell or with dumbbells, to develop their back muscles. It looks something like this.

Over time, the bent over row will reek havoc with your lower back.

Over time, the bent over row will reek havoc with your lower back.

By bending over at the waist, a lot of stress is placed on the lower back as the vertebrae compress. Over time, you’ll feel increasing pain in your lower back. 

Here's a way to strengthen your back without risking injury to your lower back: Incline Bench Rows with Dumbbells.

Incline Bench Dumbbell Rows works out your back while protecting your lower back.

Incline Bench Dumbbell Rows works out your back while protecting your lower back.

  1. Lean into an incline bench.

  2. Take a dumbbell in each hand with a neutral grip (palms facing each other), beginning with the arms straight. This will be your starting position.

  3. Retract the shoulder blades and flex the elbows to row the dumbbells to your side.

  4. At the top of the motion, squeeze the shoulder blades together, then return to the starting position.

Give the Incline Bench Dumbbell Row a try. Your lower back will thank you.

For your shoulders, don’t do that, do this.

Over time, the tendons of your shoulders start to wear down. It’s usually a combination of things: spending hours every day hunched over the computer, bench pressing weights that are too heavy, just getting older, which results in your tendons become less flexible.

You can make these problems worse if you do the wrong kinds of exercises. If you’re beyond forty and feel discomfort in your shoulders, don’t lift overhead. The worst exercises are the ones where you press the weight from behind your neck.

For your shoulders, don't lift overhead. It's even worse when you press the barbell from behind your neck, like this guy.

For your shoulders, don't lift overhead. It's even worse when you press the barbell from behind your neck, like this guy.

When you press the barbell behind your neck, your shoulders externally rotate, causing the tendons to rub against the bones in the shoulder. Even lifting the weights in front of your head, though not as bad as behind the neck, can make your shoulders ache.

What to do? The trick is to work out the shoulder muscles without externally rotating the shoulders. A terrific exercise is the Scaption.

Preparation

  1. Hold the dumbbells at your side, with palms facing the side of your body.

  2. Contract your glutes, draw in your navel, and retract and lower your shoulder blades.

Movement

  1. Raise both arms, thumbs up, at a 45-degree angle in front of the body, until your arms are parallel to the floor.

  2. Slowly return your arms back to the side of your body and repeat.

Give scaptions a try. Your shoulders will thank you.

Heat or Cold When Pain Comes Your Way?


Into every joint some pain must fall. It may be a sprain, strain, arthritis, tendinitis, or something else. Keep these practices in mind.

• Sports injuries: Use ice for acute pain, inflammation, and swelling. Heat perpetuates the cycle of inflammation and can be harmful. 
• Headaches: Cold masks or wraps over the forehead, eyes and temples help the throbbing pain of a migraine. Ice is preferred, but heat wraps can halt neck spasms that contribute to headache.
• Arthritis: Heat wins for arthritis and injuries that linger more than six weeks. For acute gout flares, go for the ice.

Should I do cardio before breakfast to lose fat?


It makes perfect sense. While you sleep, your body depletes its stores of glycogen, (which come from carbs and your body uses for energy). If you do cardio before breakfast, your body will have to burn up fat for energy instead of burning up carbs. Presto chango, the fat burns away! Alas, it’s not so easy.

Exercise affects how your body burns fat over the course of days, not just hour to hour. Your body continually adjusts its use of fat and carbohydrate for fuel. If you burn more fat during a workout, you’ll burn more carbohydrates, but not as much fat, the rest of the day.

Sadly, your body just can’t use all that fat for fuel. During moderate-to-high intensity levels of exercise, the body breaks down significantly more fat when fasted. Unfortunately, the rate of breakdown exceeds the body’s ability to use the extra fatty acids for fuel. In other words, you have a lot of extra fatty acids floating around in the blood that can’t be used by working muscles. After your workout, these fatty acids shuttle back into fat cells, leaving you where you started. Why did I get up so early?

Have you ever tried to do a strenuous workout on an empty stomach? Before long you run out of gas. Your body needs those carbs for energy. So you burn fewer calories both during and after exercise, meaning you burn less fat.

Your body has to get energy from somewhere, and that somewhere is protein. Burning protein means losing muscle. Protein losses can exceed ten percent of the total calories burned over the course of a one-hour cardio session — more than double that of training after you’ve eaten.

If you work out first thing in the morning, eat some carbs and protein first. If you eat first, the vast majority of calories expended after you exercise come from fat!

Leave the Potatoes on the Couch: Exercise Key to Healthy Aging


If I haven’t worked out in years, is there any benefit to starting an exercise program now?

Absolutely yes. Whether you haven’t exerted yourself in quite a while, or never exercised, working out will make a huge difference.

In a paper published in the British Journal of Sports Medicine, researchers studied 3454 people, average age 64, who were either inactive, moderately active (at least one moderate physical activity a week), or vigorously active (at least one vigorous activity a week). Those who became physically active, compared to those who remained inactive, were more than three times as likely to be “healthy agers.” Healthy aging was defined as (1) being free from major chronic disease; (2) having no major impairment of cognitive function; (3) having no major limitation of physical functions and (4) and having good mental health. One scientist said, “This research shows us that even if you don’t become active until later in life, your health will still benefit.” So don’t think it’s too late. You can reap huge benefits from exercise, no matter when you start.

First Let's Stretch a Minute

stretch.jpg

For generations, every sports team, gym class, and recreational athlete was told to stretch first thing. It was assumed that stretching prepped the muscles for better performance. Then research came out saying that static stretching, the kind where you hold the stretch for a while, actually reduces strength, speed, and power. So stretching has been getting a bad rap. Should we even bother?

In the March 2012 issue of Medicine and Science in Sports and Exercise, Effect of Acute Static Stretch on Maximal Muscle Performance: A Systematic Review, researchers looked at 106 of the best studies concerning stretching. The researchers were particularly interested in whether the length of time spent stretching impacted strength, speed, and power. They concluded that in the large majority of studies, static stretches held for less than 60 seconds did not impact maximal physical performance. So go ahead and stretch, just don’t hold the stretch for more than a minute.